Interacting with Docker Containers
Docker! Part 2 - I see you’re there, but are you real?
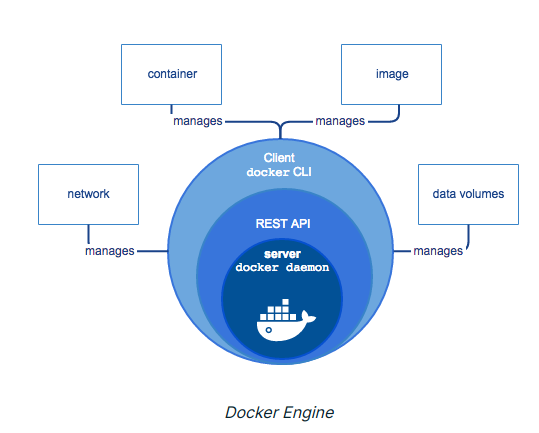
Deeper Dive into the Container architecture
The purpose of this post is to get a little deeper into interacting with Docker containers with the purpose of understanding how they are made useful development environments. We’ll look at command executions, volumes, and basic development infrastructure. Following posts will focus on more advanced topics like more complex build scripts, uploading to AWS and multi-container orchestration.
I can’t get no… Interaction
As noted previously, I am using both Visual Studio Code and PyCharm Pro as IDE’s, and I intend to exploit the Docker plugin available for both of them to the fullest possible extent. It just makes things easier. Purists be damned.
Using VS Code, I was able to get up and running pretty fast with my container. As shown below, using the default Docker plugin config in VS Code, I can get to the filesystem, and open up files for editing in the IDE.

Pycharm was a bit more complicated. I wanted to focus on figuring out how to use it because I do a lot of development in Python, and PyCharm automates a lot of the mundane stuff quite well. The setup on Pycharm was not as straight forward as VS Code. But I think a key reason for this is that I have not been thinking about containers the right way… I have been thinking of them as mini virtual machines that are to be built and curated and nurtured over time. Like plants. But that is entirely wrong!

“Docker containers are not plants.” - Albert Einstein
A Docker container is best not managed like a plant. As a matter of fact, it’s not meant to be managed at all. Containers are meant to be be spun up when they are needed, and custom built based on a pre-defined script that includes all of the software, files, and connectivity that is needed to make them run. When I finally realized this, it changed the way I was approaching interacting with this technology. Instead of building a machine and developing in it, I will develop outside of it, and then just push everything to it at build time.
Docker makes this easy - Docker Compose allows for environment scripting using Dockerfiles and docker-compose scripts. I referred to several websites to learn how to do this, notably one from PyCharm that was a very helpful start.
Simple project #1 - Simple web app
As documented in the last post, I pulled the official nginx image from the Docker registry. Right out of the gate, I was surprised to see how light the images on the Docker registry are. I mean really, really light. You are not getting a complete, fully loaded Linux OS from liveCD. There’s no ping command for God’s sake. So, everything has to get added. Per the Docker best practices guide, this is intention. Even the scripts should be kept as compact as possible, more on that below. Anyway onto the scripts.
The Set Up
So, inside baseball comment for people using PyCharm - you want to create a local project on the host PC. This is so counter-intuitive to the initiated like me - but remember, we’re developing locally, and spinning up. In the old days, these things all had to be installed manually. Using CD’s. Now it’s just a line in a yml file. I’m not sure which of the meme dogs below this would refer to.

There are three main files were going to be concerned with:
- Dockerfile: where we will set up the Python environment for the app - there are a bunch of cool things we can do in here. The Docker website has a great reference too
- docker-compose.yml to set up how to run the Dockerfile, and add the webapp, a database, expose ports, etc.
- docker-compose.dev.yml to make some changes for local development. In this case, it’s where the volume is defined. Please recall that the volume is where more persistent storage is maintained. I don’t fully understand why this has to be in a separate compose folder, or even how Docker knows it’s there. I will come back to this.
Also - a requirements.txt is necessary in order to inform and install the python specific dependencies. For now, we can just add “Flask=2.0.1”, as this was the current Flask version at the time of this post. Of course, it is possible to get all of the requirements for a python project by simply freezing from within the project directory:
pip freeze > requirements.txt
The Dockerfile
Below is the file being used for this project.
FROM python:3

EXPOSE 5000

RUN mkdir /app
WORKDIR /app

COPY requirements.txt /app/requirements.txt
RUN pip install -r requirements.txt

COPY . /app

CMD python app.py
This isn’t too bad. Here’s how I understand it:
The FROM python:3 means we’re pulling the pre-made python image from the Docker Hub. We’re then exposing port 5000, because that’s what Flask will run on. On the new container, we’ll make a directory for the app and work in it.
After copying requirements.txt to the directory, we’ll install all the libraries using pip. Then we’ll copy all of the project files over. Finally, we’ll run the Flask app.py.
The docker-compose.yml file
Below is the file being used for this project.
version: '3.7'
services:
  web:
    build: .
    ports:
    - "5000:5000"
    security_opt:
      - seccomp:unconfined
      - apparmor:unconfined
The file is split up into service definitions. Services may include things like web, db, frontend, reddis etc. Since we are doing a simple web app, we only need web. We are building from the Dockerfile in the current directory (“.”), and binding the container and the host machine to the exposed port, 5000, the default port for the Flask web server. The last piece is me simply disabling apparmor for this container. I know it is wrong, and I will go back eventually and correct this.
The docker-compose.dev.yml file
Below is the file being used for this project. A good reference is here.
version: '3.7'
services:
  web:
    volumes:
      - .:/app
I am confused by the use of a second yml config file - I think it’s to separate the volume definition from the rest of the parameters, but I need to look more into how this works. How does Docker know which compose file to look at? You can specify with the -f switch:
docker-compose -f docker-compose.dev.yml up --build
Presumably if you don’t specify, it tries to look at them all. There’s more on development uses for Python on the Docker website.
Volumes are also a bit of a mystery… There is a ton of great info on this subject on the Docker website as well, but I am just going to highlight the key takeaways I learned from this project. Some notes directly from Docker: Volumes are the preferred mechanism for persisting data generated by and used by Docker containers. Volumes can be more safely shared among multiple containers and volume drivers let you store volumes on remote hosts or cloud providers, to encrypt the contents of volumes, or to add other functionality. New volumes can have their content pre-populated by a container. And finally, a volume does not increase the size of the containers using it, and the volume’s contents exist outside the lifecycle of a given container.
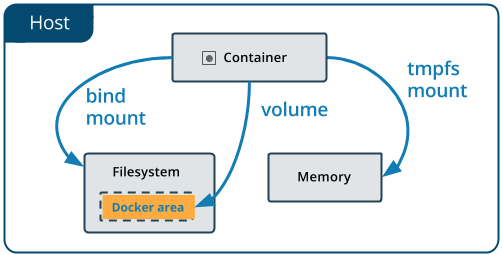
In the case of this example, we are using the short syntax to assign the relative path of the current directory (“.”) to the target container path where the volume is mounted. In this case that will be the “/app” directory where we are copying all of the application files.
Note that on the first invocation of docker-compose up the volume will be created. The same volume will be reused on following invocations (e.g. using the –build switch). It’s possible to have the same volume assigned to different paths in the container. You can also use externally created volumes in compose - see the reference docs for more.
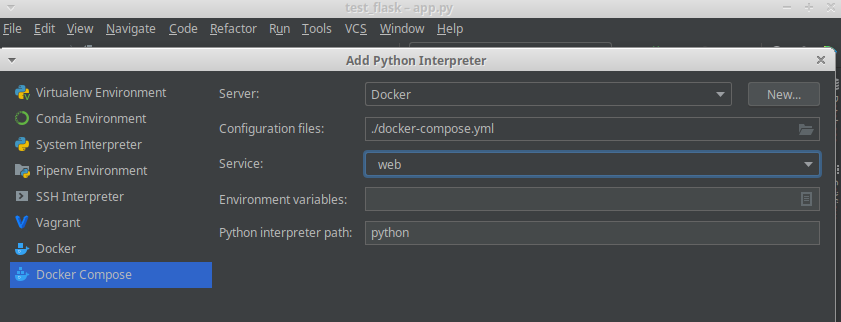
PyCharm - set the interpreter
Once the local project has been created, it is necessary to change the interpreter to and signify that it’s based on Docker Compose. The purpose of this is to allow you to run the app directly form PyCharm using Docker-compose. I know this seems decadent considering this all can be done from the terminal, but it can save time.
To do that, you just need to click on the interpreter bar at the bottom right part of the screen, and select “Add a new interpreter”. Choose “Docker Compose”, with the settings below.
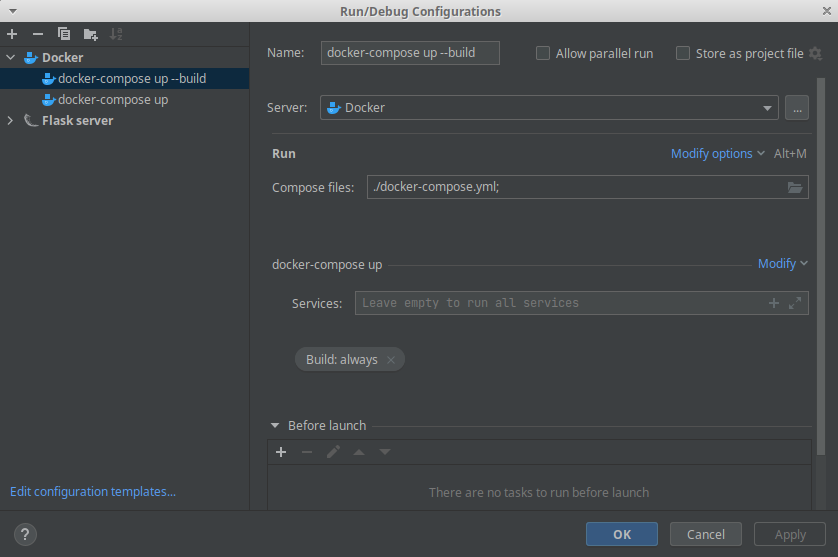
After that, you need to map a path which will map the project root with the /app directory in the container. I am not sure why this is needed if that’s documented in the docker-compose file, but that’s what the instructions say and it’s not that big enough of a deal to spend a lot of time on. When the interpreter is set up, it can be used to set up a run or debug configuration, as shown below. I set up two, one for docker-compose up and another one for docker-compose up --build. The difference between these two is that the –build parameter will Build images before starting the containers which means that changes to the application files will be picked up and reflected in the browser.
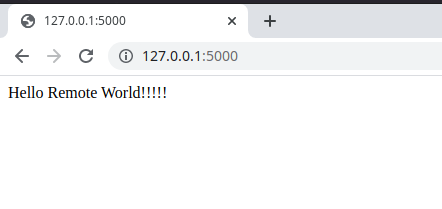
Testing the web app
When all the set up is done, the container can be created using the docker-compose up command in the terminal, or using the run configuration in PyCharm. The Deploy Log screen will show the progress of the deployment, and will show an errors that are encountered.

Once the log indicates that the webserver is “Running on http://172.18.0.2:5000/ (Press CTRL+C to quit)”, then the content should be available in the browser.
Conclusion
Ok, continuing to make progress! Today’s work makes using Docker for development as a viable solution. Next time, let’s try to deploy to AWS.