In the Land of Milk and Honeypots, part three
Let’s set up the server…

As noted in my previous entries, I have been messing around with and documenting the creation of a honeypot server and environs, and the use of tools and techniques to analyze activity. In the last post I set up the router using OpenWRT. In this post, I will outline what was done to build the machine and setting up the base of the server environment.
Cheap chips
The thing that is being reenforced to me as I move through this project is the ease and accessibility of the technology and software needed to complete it. While Thomas Friedman might have proclaimed that the world is flat in his book a few years back, in no other place than information technology is this more evident and apparent. There is so much readily availble electronics, and open source software, anyone can have in their hands almost immediately the tools they need. Can you think of any other profession or hobby that is so instantaneously accessible?
Case in point, for this project I needed a separate, stand-alone device to throw to the wolves. And, as previously documented, I am not interested in spending too much on this project. But I know I need something with a little power behind it, otherwise what’s the point? Toward that end, I took this old computer that was in my basement, and designated it my DMZ device:

I yanked a bunch of critical pieces out of it, and put them in a box, like so… and then I replaced them with newer, cooler faster critical pieces.
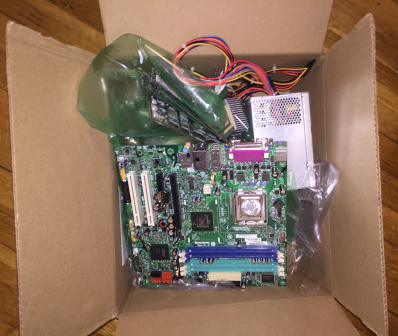
And when’s all said and done, I now have a more or less modern and beefy machine for some pretty short money.

How many cores is that? That’s right, it’s 8 bitches! I am hoping that helps with processing on the virtual machines, along with enough RAM to make it look like I am trying to overcompensate for personal shortcomings.
Setting up the host server
For the OS, I decided to go with Ubuntu server. I looked into Windows and a bunch of distro’s but I really like Ubuntu. It’s powerful, yet friendly. Even the error messages are pleasant and helpful. Why yes, thank you Ubuntu I think I will install that program.

For packages and software, I kept it very simple. No GUI, no extra packages, no servers, limited services etc. Actually, during the installation, when it asked me what I wanted to install, I think I only chose the SSH server, and host visualization tools. I’ll get into configuring them a little later. I also want to harden the device, even more than the guest VM’s, because this has got to last for the ages, while I imagine that the guests will be getting reset on a fairly regular basis.
SSH keys
As with the router, will route most of the traffic through ssh, and secure authentication via keys. I generated my keys elsewere and copied them onto the server using this nifty command:
ssh-copy-id username@ip_address
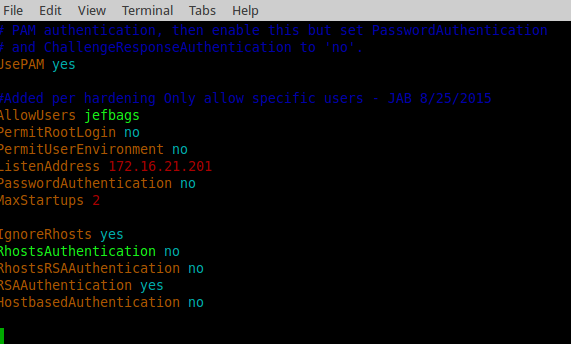
I also added the following to sshd.config
I limited access via ssh on my new port with a quick rule using ufw:
sudo ufw allow from 172.16.21.201 to any port xxxx
Other Hardening Stuff
I mainly followed the instructions in this pretty good guide: ( http://hardenubuntu.com/), however I also referred to other sources, including the SANS guide (http://www.sans.org/media/score/checklists/linuxchecklist.pdf) and NIST checklist (https://www.nsa.gov/ia/_files/os/redhat/NSA_RHEL_5_GUIDE_v4.2.pdf) which were both slightly less applicable but still really good to look at. Among some of things that were done:
- disabled the root account sudo passwd -l root
- changed password policy
- disabled ipv6 for now
- upgraded openssl
- secured shared memory
- limited ssh access from the nat address of the router
- changed the ssh port
- secured the /tmp and /var/tmp folders
- removed unneeded services
- disabled access to compilers
- set alerts on login attempts
- installed and configured fail2ban
- installed and configured PSAD Intrusion Detection
- installed and configured the UFW (Uncomplicated Firewall)
- set configurations to prevent IP Spoofing attacks
-
set configurations to prevent Ping Floods
  sudo iptables -A INPUT -p icmp -m limit --limit 6/s --limit-burst 1 -j ACCEPT
  sudo iptables -A INPUT -p icmp -j DROP
Some notes…
To get PSAD to work the following lines are required:
sudo iptables -A INPUT -j LOG
sudo iptables -A FORWARD -j LOG
sudo ip6tables -A INPUT -j LOG
sudo ip6tables -A FORWARD -j LOG
If UFW is installed then this is needed instead.
sudo ufw logging on
I was still having problems with the psad application though. I was getting “[psad-status] firewall setup warning” emails that indicated “You may just need to add a default logging rule to the /sbin/iptables ‘filter’ ‘INPUT’ chain”. The thing is I had done this, so I couldn’t figure it out. First, the IPTables commands I entered in would get wiped out after each reboot. To combat this and save the iptables commands, I needed to save the current IPtables config using the command:
iptables-save > /pathname
and then add the following to /etc/rc.local:
iptables-restore < /pathname
For some reason that didn’t solve it though, and no matter what I tried, I just couldn’t seem to clear the error. So what I ended up doing is setting the psad service to start manually:
update-rc.d psad disable
Then, I added the following to rc.local to add the lines I needed, and start the service:
sudo iptables -A INPUT -j LOG
sudo iptables -A FORWARD -j LOG
sudo ip6tables -A INPUT -j LOG
sudo ip6tables -A FORWARD -j LOG

sudo service psad start
That seemed to fix the issued related to PSAD on Ubuntu server 15.
Setting up email
One thing I wanted from this was email up and running so I can send alerts to myself. I know that there To set up email, I decided to go with Postfix, and leverage Google for relaying. I know that there are other options. I guess could have used dynamic DNS, and set things up with my domain registration etc… but that is way more complicated than what I want to do for the purposes of this experiment. Plus, you have to give Google credit for making this so easy and accessible. There are tons on tutorials on how to set this on the Internet (I used this one: ( https://wiki.amahi.org/index.php/Gmail_As_Relay_On_Ubuntu). Also, I made an account specifically for this purposes.
Although the setup went fine, I did have some issues with security worth mentioning. When I tried to send a test message, I got this message from Google:

I reviewed the logs and noted the message:
SASL authentication failed; server smtp.gmail.com... Please log in via your web browser and then try again.
The fix for this is to install an application specific password in Gmail. Its necessary to edit /etc/postfix/sasl_passwd and update it with the newly generated application specific password. The new password must be re-hashed:
postmap /etc/postfix/sasl_passwd
Also, as good practice, ensure that the files /etc/postfix/sasl_passwd and /etc/postfix/sasl_passwd.db are accessible by root only by changing the ownership and permissions appropriately (chmod 400).
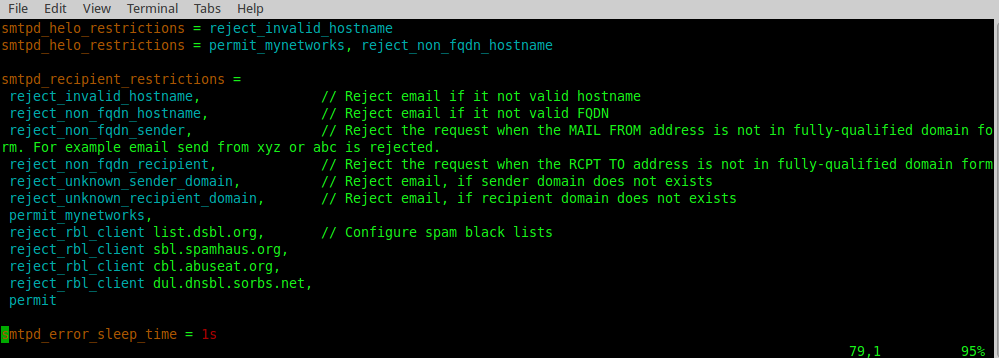
I also secured postfix by changing a bunch of permissions on various postfix files, and also by editing the main.cfg file. Some items of note are below.
I added the following to limit denial of service attacks:
	default_process_limit = 100
	smtpd_client_connection_count_limit = 10
	smtpd_client_connection_rate_limit = 30
	queue_minfree = 20971520
	header_size_limit = 51200
	message_size_limit = 10485760
	smtpd_recipient_limit = 100
And a bunch of others to limit mail to valid recipients only:
More hardening stuff
IPTables
The hardending guide had some really neat IPTables configurations I wanted to take down for reference.
Limit Imcoming SSH Connections
sudo iptables -I INPUT -p tcp --dport 22 -i eth0 -m state --state NEW -m recent --set
sudo iptables -I INPUT -p tcp --dport 22 -i eth0 -m state --state NEW -m recent --update --seconds 60 --hitcount 5 -j DROP
Rate-limit Incoming SSH Port Connections
sudo iptables -I INPUT -p tcp --dport ssh -i eth0 -m state --state NEW -m recent  --set
sudo iptables -I INPUT -p tcp --dport ssh -i eth0 -m state --state NEW -m recent  --update --seconds 15 --hitcount 3 -j DROP
Anyone who tried to portscan us is locked out for an entire day.
sudo iptables -A INPUT   -m recent --name portscan --rcheck --seconds 86400 -j DROP
sudo iptables -A FORWARD -m recent --name portscan --rcheck --seconds 86400 -j DROP
Once the day has passed, remove them from the portscan list.
sudo iptables -A INPUT   -m recent --name portscan --remove
sudo iptables -A FORWARD -m recent --name portscan --remove
These rules add scanners to the portscan list, and log the attempt.
sudo iptables -A INPUT   -p tcp -m tcp --dport 139 -m recent --name portscan --set -j LOG --log-prefix "Portscan:"
sudo iptables -A INPUT   -p tcp -m tcp --dport 139 -m recent --name portscan --set -j DROP

sudo iptables -A FORWARD -p tcp -m tcp --dport 139 -m recent --name portscan --set -j LOG --log-prefix "Portscan:"
sudo iptables -A FORWARD -p tcp -m tcp --dport 139 -m recent --name portscan --set -j DROP
Force SYN packets check
sudo iptables -A INPUT -p tcp ! --syn -m state --state NEW -j DROP
Drop all NULL packets
sudo iptables -A INPUT -p tcp --tcp-flags ALL NONE -j DROP
As mentioned above, changes made manually to the IPTables config need to be saved using the command:
sudo iptables-save > /pathname
Conclusion
OK, I think this is enough for this installment. Honestly, this was a lot of work. Someone should create a distro that has all of this configured right out of the gate. I’m sure someone has, but doing all of this work has been very educational. Next time I’m going to set up backups so I don’t have to go through this again!